
How to Remove a Popcorn Ceiling in 10 Steps
APRIL 11, 2024 | Home Care Buzz Experts | 5 minute read
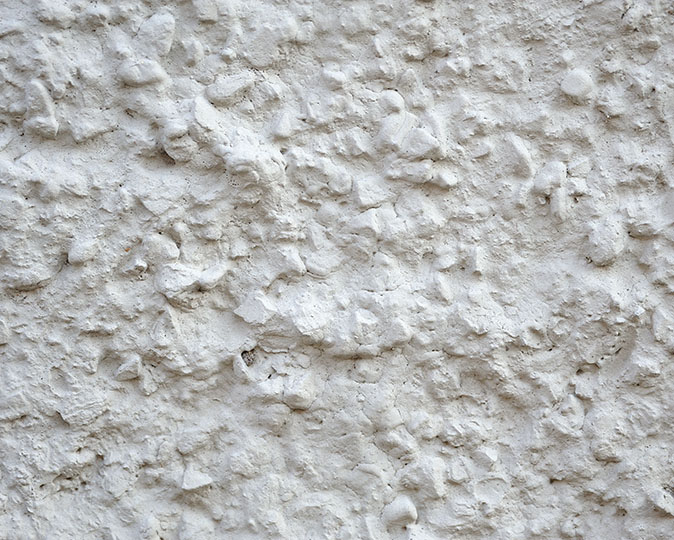
Also called stipple or acoustic ceilings, popcorn ceilings were all the rage in the 1960s and 1970s due to their cost-effectiveness, sound-reduction properties, and efficiency in hiding cracks and imperfections. The "popcorn" effect was achieved by spreading a layer of the mineral vermiculite or polystyrene — the material used in packing peanuts — over a drywall ceiling. Fast-forward to today, when people prefer cleaner, more modern ceilings and realize that popcorn ceilings hold more dirt and dust than smooth drywall.
So, what's happening to these old ceiling materials? Most homeowners remove popcorn ceiling layers in favor of the plain drywall underneath. Removing popcorn ceilings is often a surprisingly simple process many homeowners can do themselves using one of a few different methods, including using a popcorn ceiling removal tool. Are you tired of looking at your popcorn-textured ceiling and having to frequently bring out the duster to clean it? Read on to find out how to remove a popcorn ceiling so you can enjoy a more contemporary finish.
Before You Start, Test for Asbestos and Paint
While most popcorn ceilings were made with vermiculite or polystyrene, some that were produced in the ’60s were made with asbestos fibers. While building materials made with asbestos were eventually banned, those that were made before the ban were allowed to be used in construction. So, if your home was built before the 1980s and you have not had it inspected or tested for asbestos, it could still be there.
Asbestos fibers in building materials aren't hazardous unless they're disturbed. Unfortunately, that means you must hire a professional to remove popcorn ceilings containing asbestos. Asbestos test kits aren't expensive and can be found at your local hardware store, so test your ceilings beforehand to avoid a major health hazard.
If you don't detect asbestos, the next thing you should test for is a layer of paint on top of or mixed into the popcorn texture. The tacky texture of paint makes scraping polystyrene and vermiculite very difficult, even with a popcorn ceiling removal machine. To find out if you're dealing with paint, dampen a small area of the popcorn ceiling and wait before trying to scrape it off with a paint scraper. If the water isn't absorbed and it's difficult to scrape, paint is probably in the mix. It's still possible to remove a painted popcorn ceiling, but many homeowners will opt for calling a professional to complete the job.
Scraping vs. Sanding
Assuming your popcorn ceiling doesn't contain asbestos or paint, you need to decide whether to scrape or sand the textured layer away. Scraping the popcorn texture means using a paint scraper to scratch off the material in sections. By sanding, you can grind off the texture with either a standard power sander or a popcorn ceiling removal tool — a specialized power sander with a long handle. Sanding may be the preferred method, as it saves time and physical effort, but not everyone can access a power sander. They can also create a lot of dust, so consider using one with a vacuum. When using a paint scraper, rounding the corners can help prevent scarring your ceiling while you're working.
How to Remove a Popcorn Ceiling
Step 1: Gather Materials
- Plastic sheeting
- Painter's tape
- Ladder
- Safety goggles
- Respirator or dust mask
- Pump sprayer, spray bottle, or hose
- Paint scraper or popcorn ceiling removal machine
- Power sander or sandpaper
- 6-inch putty knife
- Primer
- Paint
Step 2: Remove Furniture
Remove all furniture from the room so plastic sheeting can be placed evenly on floors and against walls.
Step 3: Remove and Tape Fixtures
Shut off the power to the entire room where you're working and remove any ceiling fans and lighting fixtures. If you have recessed can lighting, stick wads of newspaper into their openings as an extra layer of water protection. Then, cover openings, outlets, electrical boxes, and any exposed wires with painter's tape.
Step 4: Cover Floors and Walls with Plastic Sheeting
Spread plastic sheeting across the floor, making sure there's ample room to tape the edges to the bottoms of walls with painter's tape. You may also want to tape plastic sheets to the walls; ensure you cover the walls up to where they meet the ceiling but not any portion of the ceiling. Mess is unavoidable when you remove popcorn ceilings, so it's important to carefully and thoroughly tape seams where the sheets fit together.
Pro tip: Be sure to open all windows to help with ventilation.
Step 5: Wet the Ceiling
Use the spray pump, spray bottle, or, as a last resort, a hose to wet a small section of the ceiling, then wait 15 minutes for the water to absorb. If you wet the entire popcorn ceiling at once, you run the risk of portions drying before you can scrape or sand it, creating a drippier mess than needed. Repeat the process after 15 minutes when the water you've applied hasn't made the ceiling wet enough to easily scrape.
Step 6: Scrape or Sand the Ceiling
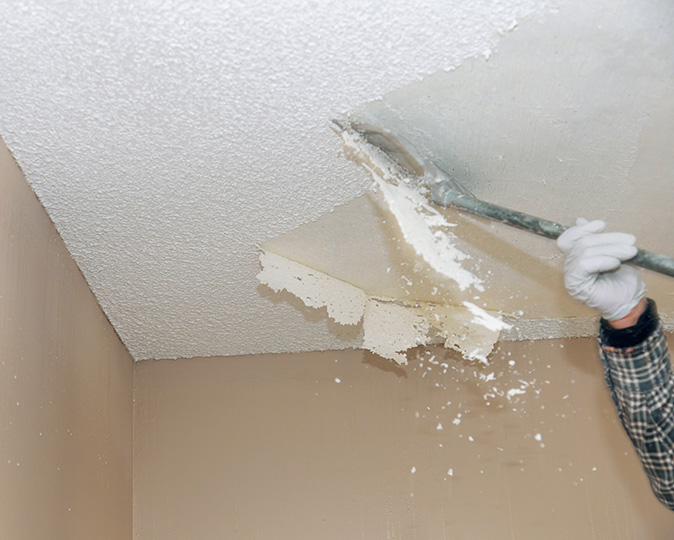
Once the popcorn texture is wet and pliable, scrape or sand a small section of the ceiling with the paint scraper or popcorn ceiling removal tool. Allow the bits of popcorn to fall onto the plastic sheeting for easy cleanup afterward.
Related: If you find stains on the ceiling after removing the popcorn, find out how to remove water stains on ceilings before moving to the next step.
Step 7: Scrape the Corners and Edges
Once you've removed most of the popcorn texture, it's time to remove any leftovers in the corners and along the edges. Wet any remaining popcorn and then scrape with the 6-inch putty knife.
Pro tip: If you have a tray or recessed ceilings, scrape carefully around the edges and corners.
Step 8: Sand the Ceiling (Again)
Once all the popcorn texture is gone, you'll need to sand the entire ceiling — a second time if you used a popcorn ceiling removal machine — to remove any imperfections and prep it for painting.
Pro tip: If you find large gouges or tears in the drywall after removing the popcorn texture, add spackling to these areas and let it dry before sanding. Find out more in our guide, How to Repair Drywall.
Step 9: Paint the Ceiling
Apply primer and allow it to dry. Then, apply your choice of paint and allow it to dry.
Step 10: Clean Up and Reassemble the Room
Carefully peel up the plastic sheeting and throw it and any other debris in the trash. Then, replace your fixtures and move your furniture back into the room.
Related: How to Install a Ceiling Fan.
Popcorn Ceiling Removal Cost vs. DIY
Depending on where you live, it can cost around $2 per square foot to hire a professional to remove popcorn ceilings in your home. However, factoring in sanding, painting, and debris removal can increase the cost to around $6 per square foot. Labor and painting materials make up the biggest portion of the cost, and of course, labor is a major factor for homeowners considering professional vs. DIY popcorn ceiling removal. While a professional crew can remove these ceilings in a medium-sized home in about a day, it typically takes DIYers much longer.
A home warranty can save homeowners like you time and money when home systems and appliances break down. If you don't have a home warranty, get a free home warranty quote today to start protecting your appliances and systems.
The contents of this article are provided for general guidance only. First American Home Warranty does not assume any responsibility for losses or damages as a result of using this information.

Keep Reading



Home Care Buzz Experts
The First American Home Care Buzz team is made up of experienced home warranty writers and editors. Our team provides valuable insights and information to help homeowners like you meet the daily challenges of homeownership.
This article is about...