
How to Diagnose and Replace a Faulty Circuit Breaker
SEPTEMBER 27, 2024 | Home Care Buzz Experts | 5 minute read
Replacing a circuit breaker is a task many homeowners might need to tackle. Ensuring your home's electrical system is in working order is essential for safety and functionality. However, it's important to remember that working with electricity carries significant risks. Mistakes can lead to serious injuries or damage to your home. This comprehensive guide will walk you through how to replace a circuit breaker and help you understand when it's best to call a professional. By the end, you'll have the knowledge to change circuit breakers safely and confidently.
How to Test a Faulty Circuit Breaker
Before replacing a circuit breaker, you need to confirm it's faulty. Here's a detailed step-by-step guide:
1. Gather Your Tools
- You will need a multimeter, insulated screwdriver, and safety gloves.
2. Safety First
- Turn off the main power to your home by switching off the main breaker.
- Put on safety gloves to protect yourself from any accidental electrical shocks.
3. Access the Circuit Breaker Panel
- Use an insulated screwdriver to remove the screws securing the breaker panel cover.
- Carefully remove the cover to expose the circuit breakers.
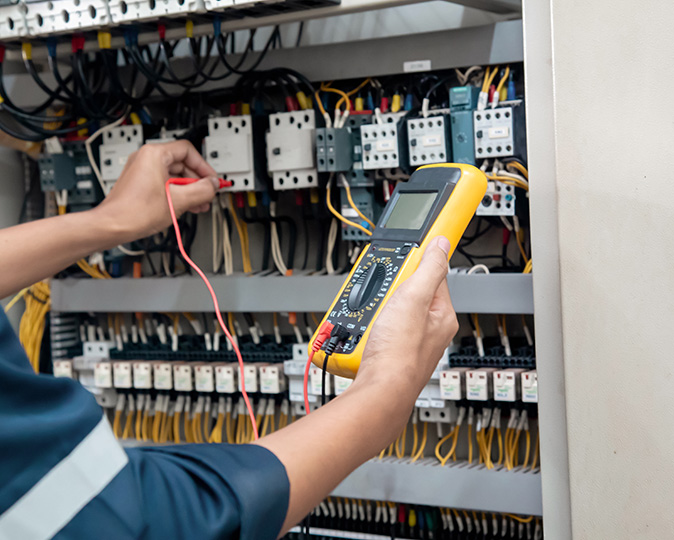
4. Set the Multimeter
- Turn on your multimeter and set it to the AC voltage setting.
- Check the multimeter on a known power source to ensure it's working correctly.
5. Test the Circuit Breaker
- Identify the breaker you suspect is faulty.
- Place one prong of the multimeter on the terminal screw of the breaker and the other prong on the ground screw.
- A reading of around 120 volts (for a single-pole breaker) or 240 volts (for a double-pole breaker) indicates the breaker is working. If the reading is zero or significantly lower, the breaker may be faulty.
6. Double-Check the Results
- Test other breakers in the panel to compare readings. This helps confirm whether the issue is with the breaker or the multimeter.
- If the breaker shows no voltage but other breakers are functioning correctly, the breaker is likely faulty.
By following these steps, you can accurately determine if a circuit breaker is faulty. If it is indeed faulty, you can proceed with replacing it, which we'll cover in the next section. Remember, safety is paramount. If at any point you feel unsure or uncomfortable, it's best to consult a professional.
How to Replace Breakers: Step by Step
1. Turn Off the Main Power
- Locate your main breaker panel and switch off the main breaker. This step ensures that no power flows to any circuits in your home, providing a safe environment for you to work in.
2. Remove the Circuit Breaker Box Panel
- Use an insulated screwdriver to remove the screws securing the panel cover.
- Carefully lift off the panel to expose the internal components of the circuit breaker box.
3. Confirm the Power is Not Flowing
- With the main power off, use a multimeter to test for any remaining voltage.
- Touch one prong of the multimeter to the terminal screw of the breaker and the other prong to the ground screw.
- Ensure the reading is zero to confirm no power flows to the circuit.
4. Disconnect the Wires
- Identify the faulty circuit breaker and note the placement of the wires. Take a photo for reference if needed.
- Unscrew the wire connections from the breaker using your screwdriver. Carefully pull the wires away from the breaker.
5. Remove the Faulty Circuit Breaker
- Gently pry the faulty breaker away from the panel using a flat-head screwdriver if necessary.
- Lift the breaker out of its slot and set it aside.
6. Attach Wires to the New Circuit Breaker
- Take the new circuit breaker and insert it into the appropriate slot in the panel.
- Connect the wires to the new breaker, matching the previous configuration.
- Securely tighten the screws to ensure a firm connection.
7. Reassemble the Panel and Restore Power
- Carefully replace the breaker panel cover and secure it with the screws.
- Switch the main breaker back on to restore power to your home.
- Test the newly installed breaker to ensure it is functioning correctly.
Safety Precautions
Working with electricity is inherently risky, so taking proper safety measures while changing a circuit breaker is crucial:
- Turn off the main power: Always ensure the main breaker is off before beginning any electrical work.
- Double-check with a multimeter: Even after switching off the main power, use a multimeter to verify that no current flows to the circuit you're working on.
- Be aware of live leads: Remember, even with the main power off, the lead from the power company is still live. Handle the panel and wires with care to avoid accidental contact.
Upgrading Your Electrical System
Should you upgrade to USB outlets? When replacing a circuit breaker, it might be a good time to consider upgrading some outlets in your home for added convenience and safety. Two types of outlets to consider are USB outlets and GFCI outlets:
- USB outlets: These outlets combine standard electrical outlets with built-in USB ports. They provide a convenient way to charge devices without needing an adapter. Upgrading to USB outlets can modernize your home and reduce clutter from chargers. Learn more by reading our USB outlet buying guide.
- GFCI outlets: Ground Fault Circuit Interrupter (GFCI) outlets are designed to protect against electrical shock by shutting off power when they detect a ground fault. They are especially important in areas with water, such as kitchens, bathrooms, and outdoor locations. Installing GFCI outlets enhances the safety of your home's electrical system. Consult our GCFI outlet guides for more information.
Cost Considerations
When planning to replace a circuit breaker, consider the following costs:
1. DIY Costs
- New circuit breaker: Depending on the type and amperage, a new circuit breaker typically costs between $10 and $50.
- Tools: Essential tools, such as a multimeter, can range from $20 to $100. Additional tools like insulated screwdrivers and safety gloves may add to the cost.
2. Professional Help
- Hourly rates: Hiring a licensed electrician generally costs between $150 and $200 per hour. Prices can vary based on your location and the complexity of the job.
- Additional costs: There may be extra charges for parts and any unforeseen complications during the job.
When to Call a Professional
If you're uncomfortable working with electricity or the problem persists after changing a circuit breaker, it's best to call a professional. Electricians have the expertise and tools to handle electrical issues safely and efficiently, minimizing the risk of injury or further damage to your home's electrical system.
Power Up with Home Warranty Coverage
Learning how to install a new circuit breaker involves several steps and requires caution. Always prioritize safety and consider professional help if you're unsure. Protecting your home's electrical system is vital, and having a home warranty can provide peace of mind. A home warranty can cover unexpected electrical repairs, saving you from unexpected expenses and stress.
The contents of this article are provided for general guidance only. First American Home Warranty does not assume any responsibility for losses or damages as a result of using this information.
Please be aware that if you disassemble a covered system or item, it can invalidate your home warranty or manufacturer's warranty.


Keep Reading




Home Care Buzz Experts
The First American Home Care Buzz team is made up of experienced home warranty writers and editors. Our team provides valuable insights and information to help homeowners like you meet the daily challenges of homeownership.
This article is about...