
How to Insulate an Attic: A DIY Guide
JUNE 10, 2025 | Home Care Buzz Experts | 6 minute read
Project Overview

Intermediate

8 Hours

> $300
All Values are Estimates
Insulating your attic is one of the best ways to make your home more energy efficient. It helps keep your home warm during winter and cool in the summer, so your heating and cooling systems don’t have to work as hard. That can lead to lower energy bills and a more comfortable home all year long.
Whether you’re a seasoned DIYer or just starting out, this guide will walk you through each step of the process.
Why Should You Insulate Your Attic?
Insulating an attic is one of the smartest home upgrades you can make. Here are some of the benefits of insulating your attic:
- Saves money on heating and cooling bills year-round
- Keeps indoor temperatures steady, so your HVAC system doesn’t have to work as hard
- Can boost your home’s resale value
What You’ll Need to Insulate Your Attic
Before you get started, gather these tools, materials, and safety items:
Tools and Materials
- Tape measure
- Utility knife or insulation cutter
- Staple gun
- Caulk or spray foam
- Ruler or straight edge
- Insulation (batts, rolls, or loose-fill)
- Rigid foam board (this is for your attic doors)
Safety Equipment
- Gloves
- Goggles or safety glasses
- Long sleeves and pants
- Dust mask or respirator
- Knee pads or boards for walking
How to Insulate Your Attic Step by Step
Insulating your attic might feel like a big job, but breaking it down into smaller steps can make it manageable. Here’s how to insulate your attic from start to finish.
1. Measure and Prepare Your Attic
Start by measuring the square footage of your attic floor. Multiply the length by the width of each section, then add them all together. This helps you figure out how much insulation you’ll need.
Next, clear out any storage boxes or debris. If your attic doesn’t have flooring, lay down temporary boards or plywood so you can move around safely. Be careful to step only on the joists or boards; never directly on the drywall ceiling below.
2. Seal Off Air Leaks
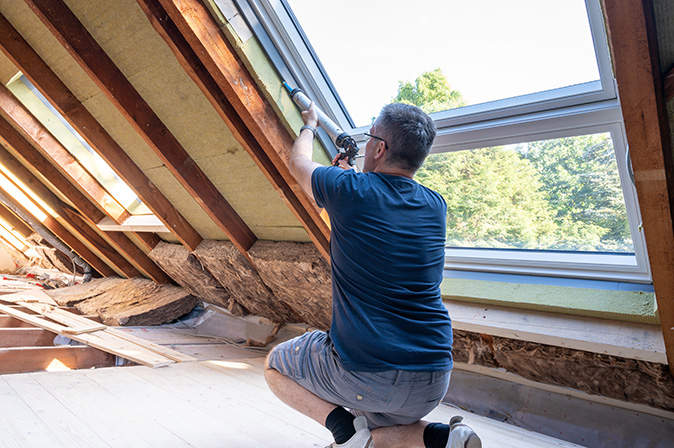
Before adding insulation, seal any gaps where air might escape. Use caulk or spray foam to close cracks around pipes, vents, chimneys, light fixtures, and wiring holes. These leaks might seem small, but they can let a lot of heated or cooled air slip out. Sealing them helps the insulation do its job more effectively to keep your home comfortable.
Pay attention to areas where different materials meet or where there's visible light shining through. If you find larger gaps or holes, stuff them with insulation and then seal with foam or caulk for extra coverage.
3. Choose the Right Insulation
There are several types of insulation for attic spaces, and the best one depends on your budget, attic layout, and whether you’re doing it yourself or hiring a pro:
- Fiberglass batts or rolls: These come in specific sizes designed to easily install between joists. They're great for open, accessible attics with standard spacing.
- Blown-in fiberglass or cellulose: This type of insulation fills gaps and hard-to-reach corners better than batts. It’s often used in irregular or tight spaces and usually requires a blowing machine.
- Spray foam insulation: This type offers excellent air sealing and insulation in one step. It expands to fill all gaps but is typically installed by professionals and is more expensive.
- Rigid foam board: This is used for attic doors or walls, not usually for the attic floor.
When choosing your insulation, look at the R-value listed on the packaging. This number shows how well the material resists heat flow. The higher the R-value, the better the insulation. For attics, aim for an R-value between R-38 and R-60, depending on your climate zone. If you're unsure, Energy Star has home insulation R-value recommendations.
4. Cut the Insulation
If you’re using batts or rolls, you’ll need to trim them to fit lengthwise. Lay the insulation on a flat surface, then use a utility knife and a straightedge (like a 2 x 4 or ruler) to cut it to the right length.
5. Install the Insulation
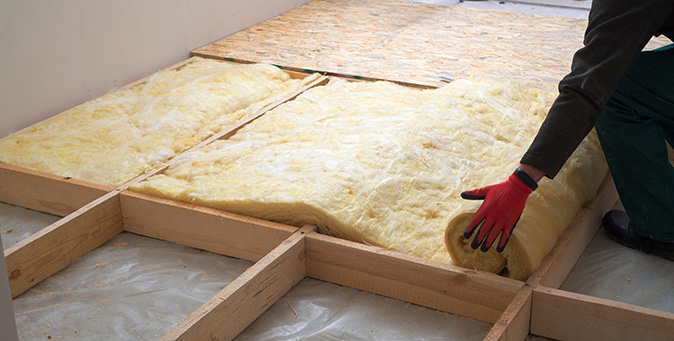
Now it’s time to put the insulation in place. Lay the batts or rolls between the joists with the vapor barrier (the paper or foil side) facing down, toward the living space. Don’t staple or compress the insulation. It works best when it’s fluffed up and fills the entire cavity.
If you’re using blown-in insulation, you can rent a machine from a home improvement store or hire a pro to do it. Follow the instructions carefully and wear the right safety gear. Spread the insulation evenly so it covers all the open areas. Just be careful not to block the attic vents near the roof’s edge (called soffit vents), which help air flow through the attic. Baffles (plastic or cardboard chutes) can help keep those vents clear.
Check around pipes and ducts to make sure everything is insulated but not overheated. Use extra insulation or foam board to fill small gaps.
6. Insulate the Attic Door
The attic door is often a big source of heat loss. To fix that, add rigid foam board to the back of the door and seal around the edges with weatherstripping. Some people also install an attic tent or cover kit for extra insulation.
Make sure the door closes tightly. A poorly sealed attic hatch can undo all the work you just did by letting air leak in and out.
7. Finish Up and Inspect Your Work
Once all the insulation is in place, take a final walkthrough. Look for any gaps, loose pieces, or blocked vents. Make sure there's enough clearance around exhaust vents, recessed lights, or chimneys. Those spots can get hot and need breathing room.
You may also want to label or map out the attic if you plan to store anything up there. Don’t place anything heavy directly on the insulation unless you’ve added flooring on top of the joists. After cleaning up tools and debris, you’re done!
Common Attic Insulation Mistakes to Avoid
Stay safe and avoid these common mistakes:
- Blocking soffit or ridge vents (you need airflow)
- Leaving gaps or compressing insulation
- Covering recessed lighting fixtures without proper protection
- Skipping air sealing before insulating
- Not wearing protective gear
- Using the wrong R-value for your climate
- Letting insulation touch hot surfaces (like metal flues)
How Much Does It Cost to Insulate an Attic Yourself?
If you're insulating your attic yourself, material costs start at about $1 to $2 per square foot, depending on the type of insulation you choose. Batt and roll insulation are usually the most budget-friendly options, while blown-in insulation can cost a bit more, especially if you need to rent a machine. Other costs might include safety gear, sealant for air leaks, and tools like a utility knife or straightedge.
While DIY insulation takes time and effort, it can save you hundreds, or even thousands, compared to hiring a pro.
Should You Insulate the Attic Yourself or Hire a Pro?
DIY attic insulation can save you money, especially if you’re using batts or rolls. But some jobs are better left to the pros, including:
- Blown-in or spray foam insulation
- Very large or hard-to-access attics
- If you’re unsure about safety or building codes
If you’re not comfortable with heights or tight spaces, calling a professional might be a better option.
Don’t Let Insulation Problems Catch You Off Guard
Adding or replacing attic insulation helps your home stay comfortable and efficient. And if you have trouble with your HVAC system or ductwork, a home warranty can help take care of the covered repairs or replacements.
Want peace of mind for the systems that keep your home running? Get a free home warranty quote today.
FAQs About Attic Insulation
Where shouldn’t the insulation go in my attic?
Avoid placing insulation over soffit vents, recessed lights (unless they’re IC-rated, which means “insulation contact” rated), or near flue pipes and anything that gives off heat. These areas either need airflow or could become fire hazards if covered.
What’s the best type of insulation for an attic?
Fiberglass batts are easiest for DIY, while blown-in cellulose or fiberglass offers better coverage. Spray foam is great for air sealing, but it costs more.
How often should attic insulation be replaced?
Attic insulation can last a long time, anywhere from 15 to 30 years, or longer. Replace it if it's wet, moldy, compacted, or damaged from pests.
Is adding insulation in my attic worth it?
Yes! It can cut your heating and cooling costs by up to 15% and make your home more comfortable. It can also help your HVAC system last longer because it doesn't have to work as hard to heat or cool your house.
The contents of this article are provided for general guidance only. First American Home Warranty does not assume any responsibility for losses or damages as a result of using this information.
Please be aware that if you disassemble a covered system or item, it can invalidate your home warranty or manufacturer's warranty.


Keep Reading




Home Care Buzz Experts
The First American Home Care Buzz team is made up of experienced home warranty writers and editors. Our team provides valuable insights and information to help homeowners like you meet the daily challenges of homeownership.
This article is about...