How to Clean Your Dryer Vent: A Guide
JUNE 05, 2025 | Home Care Buzz Experts | 4 minute read
Project Overview

Beginner

1 Hour and 30 Minutes

< $150
All Values are Estimates
Cleaning your dryer vent keeps your dryer running efficiently and helps prevent fire hazards. In this guide, you’ll learn how to spot signs that your dryer vent needs cleaning, how to clean it yourself, and tips to keep it in good condition.
Signs It’s Time to Clean Your Dryer Vent
Several warning signs may mean you need to clean your dryer vent. Let’s take a look at some of them.
- Clothes take longer to dry: If your clothes are still damp or taking longer than usual to dry, your vent might be clogged, blocking airflow in the dryer.
- Lint builds up around the dryer: If lint is collecting around the dryer or vent hose, it’s not being properly vented to the outside.
- Laundry room feels hot or humid: A buildup of lint in the vent can cause the dryer to overheat. If your laundry room feels excessively hot or humid after running a load, the vent may need cleaning.
- Burning smell: If you smell something burning while the dryer is running, lint buildup may be causing the dryer to overheat. This can be a fire risk.
- Blocked or stuck vent flap: Check the outside vent. If the flap won’t open easily or lint is stuck inside, the vent needs cleaning.
- Dryer feels too hot: If the outside of your dryer is hot to touch while its running, it could mean the vent is blocked and the dryer is working harder than it should be.
- Higher energy bills: If your energy bills have gone up but your laundry habits haven’t changed, your dryer may be running inefficiently because of a blocked vent.
How to Clean Out Your Dryer Vent in 10 Steps
Cleaning your dryer vent helps your dryer run more efficiently and reduces the risk of a fire. Follow these simple steps to do it yourself:
1. Unplug the Dryer
You should start by unplugging the dryer to avoid electrical accidents while cleaning. This helps keep both you and your machine safe.
2. Move the Dryer Away from the Wall
Next, carefully move the dryer away from the wall to give you better access to the vent hose and duct. These components are usually located on the back and near the bottom of the dryer.
3. Disconnect the Dryer Vent Hose
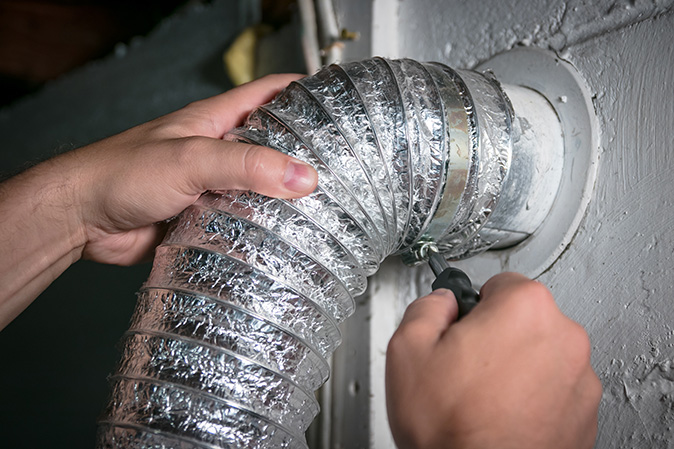
The vent hose is a tube that moves the moist air from the inside of your dryer to the outside. It’s usually connected to the back of the dryer with a clamp or a screw. Loosen the clamp or remove the screws to disconnect the hose from the dryer.
4. Clean the Vent Hose
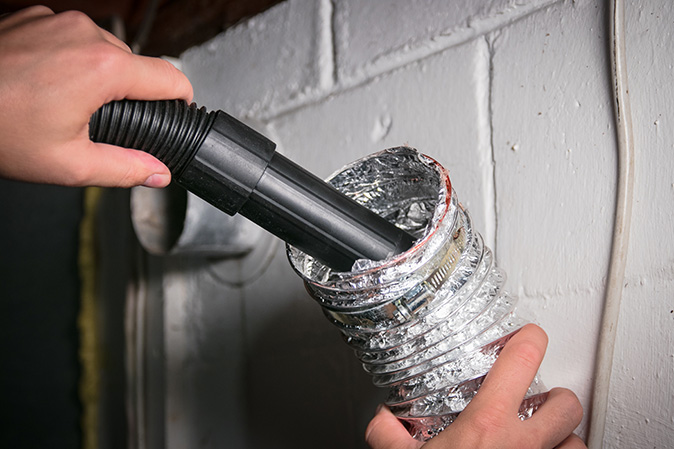
Next, gently shake the hose to dislodge any lint or debris. You can also use a vacuum with a hose attachment to clean it out. Place a cleaning brush inside the hose and gently scrub it to remove lint buildup. You can also use a long, flexible brush designed for dryer vent cleaning.
5. Clean Out the Vent Duct
Reach into the duct and use a brush or vacuum to remove lint. A vacuum with a long hose can help suck out any debris stuck in the vent. Additionally, if you find any blockages in the vent duct, carefully remove them with a long tool or brush. If the blockage is deep, you may need to call a professional.
6. Clear Lint from the Exterior Vent
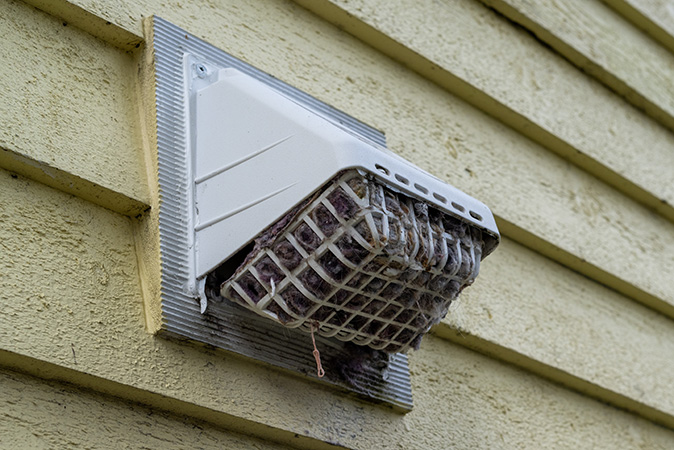
Go outside and find the exterior dryer vent, which will be located somewhere against the side of your house. It usually looks like a small, covered opening with a flap. Use a vent cleaning brush to remove any lint, dust, or debris stuck around the opening.
7. Reattach the Vent Hose
Once the interior and exterior dryer vents are clear of lint and debris buildup, you’ll need to reconnect the clean hose to the back of the dryer. Use a screwdriver to secure everything back into place.
8. Push the Dryer Back into Place
Carefully slide the dryer back into its normal position. Make sure the vent hose isn’t kinked or squished against the wall.
9. Plug the Dryer Back In
Plug the dryer back into the power source.
10. Test the Dryer
Run the dryer on a short cycle to make sure it’s venting properly. You should also feel warm air blowing out of the external vent. If airflow seems restricted, you may need to do a more in-depth clean or call a professional.
Tips for Regular Dryer Maintenance
Cleaning your dryer vent regularly not only improves the efficiency of your appliance but also reduces the risk of a fire. Here are some tips on how to regularly maintain your dryer:
- Clean the lint trap after every load to prevent buildup.
- Check the external vent occasionally to make sure it’s clear of debris, bird nests, or other blockages.
- Have a professional clean the vent every 1 to 2 years, depending on how often you use it, for a thorough cleaning.
Protect Your Dryer With a Home Warranty
DIY cleaning and upkeep are important to keep your dryer working safely. You can also protect your dryer with a home warranty. A First American Home Warranty provides you with peace of mind knowing that your appliance can be fixed or replaced if it breaks down due to normal wear and tear.
Protect your appliance with a clothes dryer warranty and keep your laundry routine running smoothly. Get a free quote today and see how a home warranty can protect your budget.
The contents of this article are provided for general guidance only. First American Home Warranty does not assume any responsibility for losses or damages as a result of using this information.
Please be aware that if you disassemble a covered system or item, it can invalidate your home warranty or manufacturer's warranty.




Keep Reading