
Sprinkler Valve Replacement: What You Need to Know
APRIL 03, 2025 | Home Care Buzz Experts | 4 minute read
Many homeowners rely on automatic irrigation systems to ensure their landscaping gets the moisture it needs to stay healthy and green. One key component of these systems is the sprinkler valve, which regulates water flow to the sprinkler heads. Over time, sprinkler valves can become faulty due to regular wear and tear, causing issues like inconsistent watering or leaking. If you notice your irrigation system isn’t functioning properly, it could be time for a sprinkler valve replacement.
In this guide, we’ll walk you through some of the warning signs that your sprinkler valve might need replacing, the tools you need to replace the valve, and the steps to follow to successfully replace it.
Signs Your Sprinkler Valve Needs to Be Replaced
There are several signs that you might need to replace your sprinkler valve. Here are some of the most common circumstances:
- Sprinklers won’t turn off: If your sprinklers continue to run even after the controller has turned off, the valve may be stuck in the “open” position. This can be the result of a faulty valve or a stuck solenoid (internal coil).
- Sprinklers won’t turn on: If your sprinkler heads aren’t turning on when the system is activated, it could be because the valve isn’t opening correctly. This might happen if the valve’s solenoid is malfunctioning or the valve’s internal components are damaged or clogged.
- Water is leaking around the valve: If you notice water leaking around the valve, especially when the system is off, it could indicate an issue with the valve seals or internal components.
- Uneven water distribution: If certain areas of your yard receive excess or no water, it could be due to a malfunctioning valve. A broken or clogged valve may not distribute water correctly to the sprinkler heads.
- The valve is damaged or corroded: If you notice visible corrosion, cracking, or physical damage to the valve body, the valve likely needs replacing.

Replacing a Sprinkler Valve: What Equipment Do You Need?
If one of the situations mentioned above is what you see happening in your yard, you’ll want to replace your sprinkler valve. Before you begin the replacement process, make sure you have the following tools and materials handy:
- New sprinkler valve: Purchase a replacement valve that fits your system's specifications.
- Pipe wrench or adjustable wrench: This is needed to loosen and tighten the nuts around the valve and pipes.
- Pipe cutter or hacksaw: You’ll need this if you have to cut the pipe to remove the old valve or adjust for the new one.
- Teflon tape (plumber’s tape): You’ll wrap this around threaded connections for a watertight seal.
- Screwdriver: This will be needed if your valve has screws or bolts that need to be removed.
- Replacement pipes or fittings: These are necessary to replace damaged or broken parts in the piping system.
How to Replace a Sprinkler Valve: 8 Steps
Now that you know when to replace a sprinkler valve and the tools needed to do so, let’s walk through the steps of the replacement process.
Step 1: Turn Off the Water
To begin replacing your sprinkler valve, turn off the main water shutoff valve for your sprinkler system. If you’re unsure where it’s located, you can follow the irrigation system’s pipes back to the point where they connect to your home’s water supply.
Step 2: Turn Off the System’s Electrical Power
If you have an automated sprinkler system, turning off the electrical supply from the controller to the system is a good idea.
Step 3: Locate the Sprinkler Valve
Next, you’ll want to find the sprinkler valve you need to replace. It’s typically housed in a valve box near the sprinkler system manifold. If necessary, you can dig up any dirt or debris around the box to expose the valve.
Step 4: Disconnect the Old Valve
Next, you’ll disconnect the old valve. Start by disconnecting the wires connecting the valve to the control system. Note the wire’s color or labeling (or snap a photo) so you can reconnect them later. Then, use a pipe cutter or hacksaw to cut the pipes on both sides of the valve.
Make sure you leave enough room to connect the new valve. Then, remove the old valve from the system.
Step 5: Install the New Valve
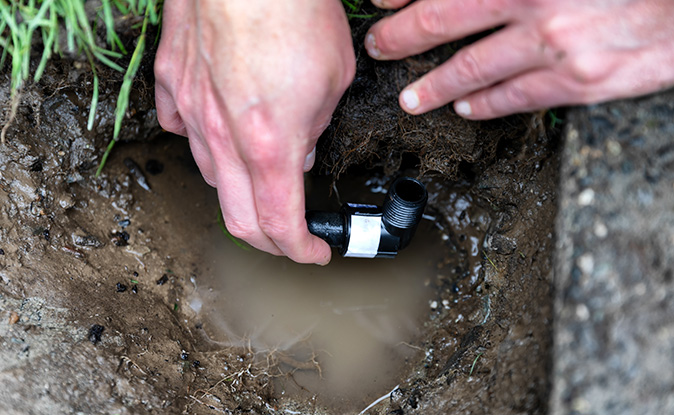
Now you’re ready to install your new valve. If you’re using PVC or CPVC pipes, apply primer to the pipe ends and the valve connections, if necessary. Then, apply glue to the pipes and attach the valve. For threaded connections, wrap Teflon tape around the threads before connecting.
Next, place the new valve where the old one was and attach the inlet and outlet pipes to it. Tighten the connections carefully to avoid damage. Finally, attach the wiring to the new valve, matching the same colors as before.
6. Check for Leaks
Before you turn the water back on, inspect all the connections for any signs of leaks, and tighten anything that feels loose.
7. Turn On the Water
Once you’ve ensured the valve is installed correctly and there aren’t any leaks, you can turn the main water supply back on.
8. Test the New Valve
Lastly, you’ll want to run a manual cycle or use the controller to test the sprinkler system and ensure the new valve works correctly. Check the valve while operating to make sure it’s functioning properly.
Protect Your House With the Right Home Warranty Plan
While a home warranty won’t cover an irrigation valve replacement, it can cover the repair or replacement of many of your home’s major systems and appliances when they break down. Whether you’re looking to protect essential household items only or want additional coverage for luxury appliances and other home features, we’ve got a home warranty plan perfect for your budget and lifestyle.
Get a quote today to learn more about our home warranty plans and discover the peace of mind that our comprehensive coverage provides.
The contents of this article are provided for general guidance only. First American Home Warranty does not assume any responsibility for losses or damages as a result of using this information.
Please be aware that if you disassemble a covered system or item, it can invalidate your home warranty or manufacturer's warranty.




Keep Reading




Home Care Buzz Experts
The First American Home Care Buzz team is made up of experienced home warranty writers and editors. Our team provides valuable insights and information to help homeowners like you meet the daily challenges of homeownership.
This article is about...